Tuesday, July 23, 2019

AAR: Yume no Bushi


I fell off the blog wagon again...

I've recently had a hankering for some medieval Japanese, skirmish-level gaming. For years, I've owned a light set of rules titled Song of Katana and Ninja by a fellow named Rich Jones. It is based out of Ganesha Games's Song of system, but had too many holes to be a viable platform.

Enter Yume no Bushi. This is the full-blown rules by Mr. Jones based on the aforementioned Song of system. It is a much more complete set of rules and allows you to play with both historical and fantastic Japanese units. It was produced in 2010 by Surf Shack Productions.

Mr. Jones has another system of rules for this period with the same name, but for 42mm miniatures.  While I have a copy of the rules, I haven't played them.

The AAR is actually two weeks worth of gaming. The first session featured my friend, Donnie, and me hashing out the rules and learning the system.  The second session included Terry, Jen, and myself.

Both sessions featured the same plot. Ninja have been hired to assassinate a local monk. The local lord has sent a small contingent of samurai to guard said monk at his temple compound.

Session 1 - July 11th


The first session was an even match in force sizes (60 points). I used ninja. Donnie was the samurai and monk.  These rules utilize some neat special abilities to capture the feel of different units. Samurai are harder to kill and can be very deadly. Ninja can be elusive and can confound their opponents with what we jokingly call "Handwavium"...basically mesmerizing their opponent with seemingly mystical hand movements.


The game table

Another angle

The temple

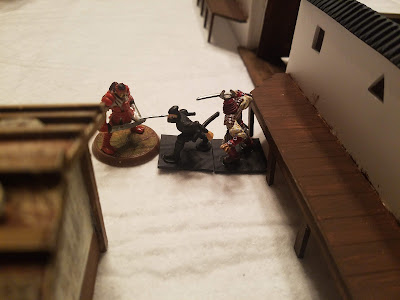
Ninjas close for the kill

The samurai converge
Long story short: The ninja were successful in slaying the monk, but at a cost of 2/3 of their forces. I was able to keep Donnie's force moving by using Ukemi, the ninja art of moving away from combat with acrobatic flair. There were several cinematic moments by both sides and we had a fun evening.

Session 2 - July 18th


This time, there were two clans of ninjas vying for the honor of killing the monk (poor guy). I played the samurai, while Terry and Jen both played ninja. I was doubled on points, although the monk did cut into that total. Having forgot my green table mat, this session occurred in the snowy Japanese winter.


I like this look better!


They're coming over the walls!

"I'll stop them!" (he didn't)


Target acquired...


Yeah, we can do that!

Long story short: This time around, the game became more of a slog. I was able to hold off both ninja factions for an extended time. The monk's plight was still "up in the air" when we called it for the night. Jen made effective use of both her shuriken and "Handwavium" skills, while Terry's poor dice rolls kept him from making too much of an impact. Again, there were some cool moments and the superior samurai armor made its presence felt a couple of times (to the ninjas' dismay)

Overall impressions of this rule set is that they are very serviceable for the time period, but you really have to utilize the special skills or risk becoming mired in the typical Song of slog. I'll be using these again with some of the more fantastic elements in my collection.

Sunday, May 12, 2019

Axles and Alloys AAR

I tried Gaslands by Osprey Publishing in September at Recruits convention. While I wasn't as enamored with the rules as I'd hoped I'd be, there were a few things in the game that I thought I could incorporate into Axles and Alloys (Free rules. If you want a copy, leave a message below). The idea of gates for races was an "Aha!" moment for me. I didn't have time to "pretty up" the gates, so you get to see them "raw" in the photos.

Players: Terry (mustard), Jon Mark (black with yellow stripe), Tim (red), Greg (blue), and me (faded black).


I decided on a somewhat twisted race design where players had to approach the first gate from an acute angle and then could make sweeping turns through gate two to the finish. The only other rule was players couldn't shoot or use dropper weapons until after they'd gone through the first gate. They could ram before that point, though. Boy, did we!


The first casualty was Tim's medium weight vehicle, courtesy of me ramming him into a stone outcropping.


My luck wasn't great, either. As Team Fishbat's medium and Team Steamer's heavy approached the first gate, my car slid a little too far and crashed into the gate's side beam. I guess bald tires and loose dirt don't mix well!


Meanwhile, Jon Mark's light car kept its nose clean and broke away from the pack.


The Rhino (back left) was searching for a target.


It found one in Greg's medium car. While it destroyed the smaller vehicle, the flames from a passing flamethrower finally killed Rhino's driver. He died, struggling to evacuate the vehicle.


Team Fishbat, round through the second gate...


...and easily making it through the finish for the win!

It was a great night of racing, with the usual A&A antics on full display. I really like the gates and have since finished painting them as well as adding another portal to the mix.

Thanks for reading!

Thursday, May 9, 2019

Creating something from nothing...

It has been a long while since I last blogged. Real Life has a way of derailing playing time. I've been gaming, just haven't been posting.

I'd bought a Skylanders: Trap Team portal for the kids, but it was a dud.  Since I'd only spent a couple of dollars on it used, I wasn't too upset.


Looking at it, I really liked the icy surface and immediately thought "I can use that". I decided I'd see how much terrain I could build with what would otherwise go in the trash.

I spent the time taking the portal apart (they're well-built!) and wound up with two components: The "icy" plastic surface and three hollow, open-sided rune-etched rocks.

Build #1: Pools

Your party quietly crept down the corridor, ears straining to hear the sounds of enemies or...anything. The passage opened to a vast room. In the center of the room was a pool, its liquid placid, but emitting a glow that illuminated the entire room.

I've long had a thought of creating pools from small picture frames. I didn't know if it would work or not (i.e., I didn't want players saying "Hey, that's a picture frame!").


  1. Buy the frames.  I bought two, 2"x3" frames from Dollar Tree.
  2. Cut out the surface. I used my rotary tool and cut out two 2"x3" rectangles to replace the glass in the frames. The plastic is thick, so I had to deburr the edges with a sharp blade and my rotary tool.
  3. Create, print and cut out liquids. I chose two types of water, ice, lava, and swamp patterns to place inside the frames. These I resized in MS Word and then printed and cut out.
  4. Texture/paint the pools' edges. Both pools needed to look like they were made of blocks, so I used either a sharp blade or my rotary tool to cut out the patterns I wanted. The first pool was made to look like gray stone. I used stone texture spray paint and then repainted it. The second pool was painted to look like white marble.


I am happy with the results. I think they are passable as small pools, and with the different liquid options, are very versatile.

Build #2: Way Markers

The path through the Dwarven tunnels was illuminated by large stone way points. The runes etched into the stones glowed with an inner light; illuminating your way through the catacombs.


  1. Fill the Sides. Since the sides of these things were open, I cut out egg carton and used a hot glue gun to attach pieces to the markers. I made sure to feather the edges to maintain a cohesive stone look.
  2. Buy the lights. Again, Dollar Tree to the rescue! I originally was going to use the larger tea lights that flicker, but didn't like the aesthetic. DT carries a second line of tea lights that are smaller in diameter and are LED. 
  3. Alter the lights. I used egg carton to warp the sides of the lights, being careful not to glue the two halves together. The tops were already textured, so I didn't apply carton to them. I then used Sharpies to color the bulb covers orange, purple, or green.
  4. Attach the pieces. I used Goop! glue and attached the markers to the bases.
  5. Paint. I painted all three to look like gray stone. 


I like these, although they are taller than I'd really wanted. I can't get around that, as the lights I used are what give them their height. The lights are a little dimmer than I'd like, but workable.

Build #3: Ice Walls

The wizard's breath plumed in the frosty air, the words in an almost forgotten, long dead language. The snow-covered ground shook, then split. Jagged pieces of ice erupted from the fissures and grew in front of the wizard. Soon, a wall of thick sheet ice separated him from the Polar Bear. It rammed against the barrier, but was unable to penetrate its layers. It soon gave up with a final, frustrated roar.

I had leftover platform bits, so I decided to make ice walls.

  1. Break up pieces. Using pliers and force, I broke the pieces into shards.
  2. Create foundation. I used EPVC (Extruded PVC) for the bases and rounded the edges. EPVC is as thick as foam board, but is more dense and won't flex as much. It also takes paint very well. Scraps can usually be found at sign-making shops. I get mine for free.
  3. Attach ice. I hot glued the shards to the base, making sure the pieces overlapped.
  4. Flock. I used snow flocking for this. The EPVC is white, so I simply spread PVA glue (i.e., Aylene's or Elmer's) over the surface with an old brush and applied the flocking. Make sure to get flocking in between the ice layers to make it really look like they erupted from the ground.
  5. Seal. Making sure to not get too much on the ice shards, I sealed the flocking to the base with matte spray sealant.


These are tall enough where they should provide "full protective coverage" (the Heroclix minis are on extra thick/tall bases), but there are some slightly lower points. You can discuss it with your mates on how they can be used in whatever rules with which you're playing.

Final Takeaway

I'm happy that I made three terrain projects from one broken piece of electronics! As an added bonus, I feel that all three are table-ready. Not bad for spending roughly $5 and using supplies I already had around the house. I really don't have a use for any of them at this point, but someday...maybe.